A Domain Name Server (DNS) is basically the address book of the world wide web. What it does in very simple terms is it converts a web address like www.keithrozario.com into an Internet Protocol address like 208.94.116.157 (this might look like garbage but it’s actually 4 numbers separated by a dot, and it’s these 4 numbers that uniquely define every machine on the internet).
It’s the Internet Protocol address that can actually get you to your destination. Think of it like the actual phone number of the person. It’s nice to know someone’s name, like Keith Rozario, but it means nothing in terms of contacting me if you don’t have my Phone Number. So if you wanted to contact me with just my name, you’d have to look for something called a ‘phone book’. In this case, the DNS is the phone book, that translates a name to a number, and the DNS is publicly available.So what is a Dynamic DNS? Well, that’s where the allocation from name to IP is dynamically allocated. For instance, the IP address of my website has remained static for the 1.5 years it’s been around. So the DNS allocation for my website is pretty much stable. Although I did recently change the web-host, but that’s another story.
However the IP address of my home Unifi connection changes everytime I restart my router, which is about once a week or so. If I wanted to add some sort of permanence to my connection, without splurging for expensive static IP packages, I could opt for a Dynamic DNS (or DDNS).
So let’s say I have a IP camera at home, that’s recording a video feed that I can view on my phone. If I connected my phone to the IP address directly, that wouldn’t be a good idea. If the connection dropped while I was away, or my house had an intermittent power cut, that forced the router to re-start (and hence change it’s IP), I would lose all connectivity to the IP camera, and my entire home network as well. This is because, I wouldn’t know what my home network IP address would be anymore, and hence have no way to contact it. It’s like changing my phone number, if you keep trying to call your old number you’d most probably get an error message, or wind up calling someone else.
How does the Dynamic DNS work?
Dynamic DNS solves that, in most implementations of Dynamic DNS, a piece of software is installed either on your router or local machine. This software intermittently updates the Dynamic DNS server of it’s current IP address. Once the Dynamic DNS server knows of the new IP it can then update the DNS. Once the DNS is updated it will then automatically resolve itself to the correct IP address.
Basically in one word, a Dynamic DNS makes sure it always resolves to the same machine, even though the IP address of the machine is changing.
So in this case, I would point my camera app to something like http://keithscamera.dlinkddns.com (a Dynamic DNS service from DLink). And setup my router to periodically update the DNS server with it’s IP address. This way, if the router restarts for whatever reason, it’ll update the Dynamic DNS servers of it’s new IP. So that keithscamera.dlinkddns.com always resolves to my home network.
Setting up Dynamic DNS for your Unifi connection
The Dlink Dir-615 router you get with Unifi has an inbuilt DNS functionality. It even comes with Dynamic DNS service called Dlinkddns (duh!). It’s a FREE service, and you can subscribe using the router that comes with your default Unifi installation.
So here’s a quick step-by-step guide to setting up a Free Dlink DDNS service on your unifi Router
Step 1 : Logon to your router
Obviously the first step is logging onto your router, if you’re unsure of your how to do this then you probably need to read the basics from this post on how to change your unifi password.
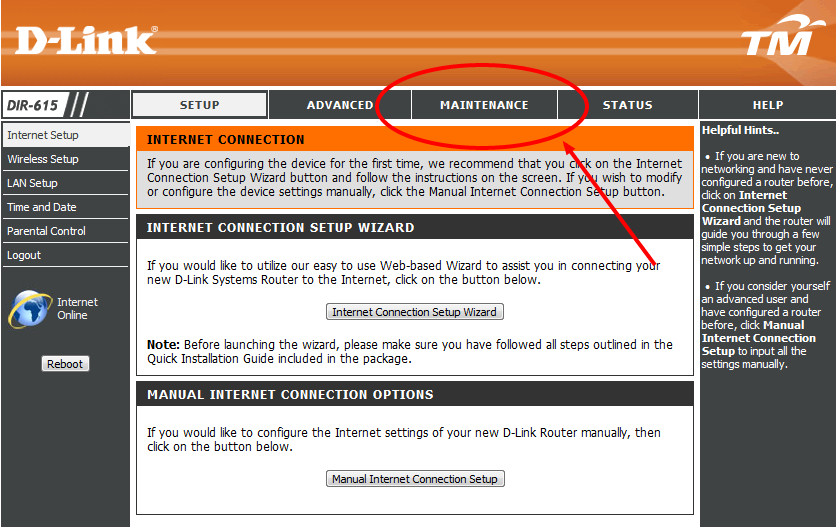
Step 2: Proceed to the Maintenance Menu
There’s a special Menu on the DLink router that has access to the settings for the Dynamic DNS services, the router supports many services including dyndns, but for the purpose of this example we’ll use the DlinkDDNS.
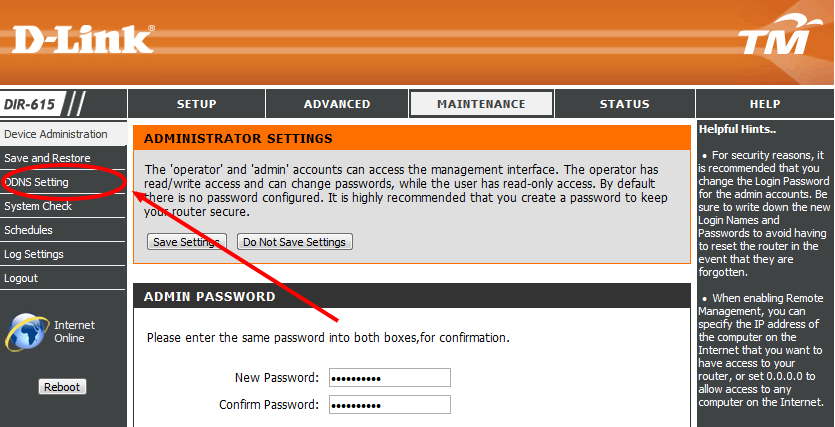
Step 2.1 : Proceed to the DDNS Menu
Then proceed to the DDNS setting page from the left menu bar:
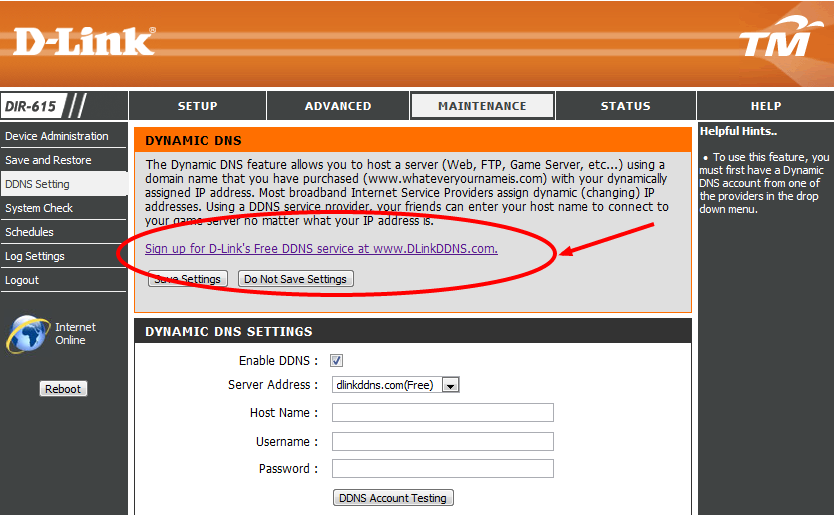
Step 3 : Signup to DlinkDDNS by clicking on the link in the browser
Clicking on the link in the browser window will take you to the DlinkDDNS website. Here you can signup for the free service.
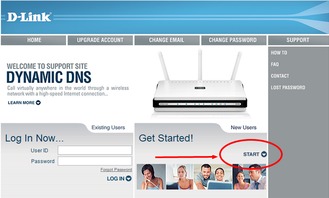
Step 4 : Click Get Started
Pretty self-explanatory.
Step 5 : Enter sign in Details
For the purpose of this example, I’ll be using an account called keithtest1234. Remember your username and password here, as we’ll be entering them into the router later.
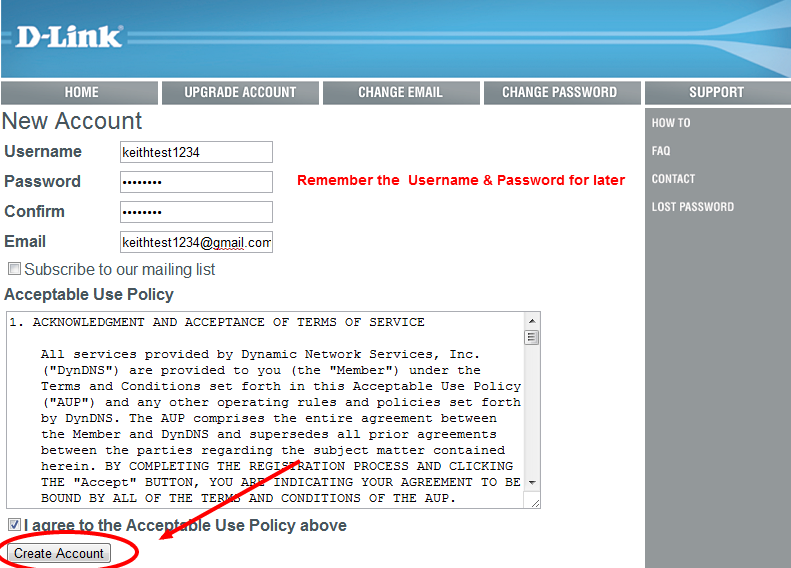
Step 6 : Activate account
Once you’re done. Dlink Will send you an email to the email account you entered in Step 4. Just click on the confirmation link for the activation URL and you should be done.
Remember, sometimes these emails get incorrectly marked as Spam, if you don’t receive anything in 30 minutes, check your spam box.
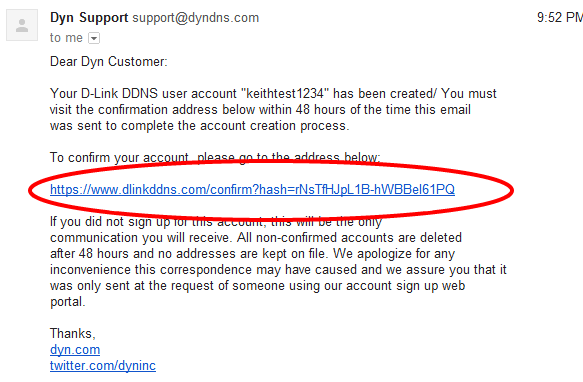
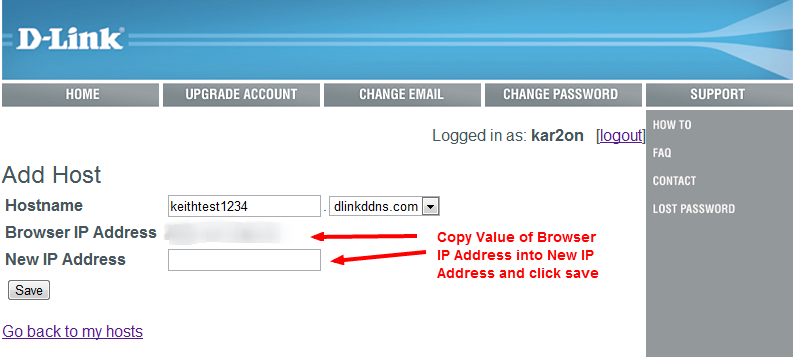
Step 7 : Create a Host on DlinkDDNS
Now logon onto your already activated account on DlinkDDNS, and click on the Add Host button. This will be your DNS entry for your home network from now on.
Be sure to use a unique name, however you may also want to be sure it’s not an easy URL. This will be the URL of your home network, which may include access to stuff like your IP cameras and NAS devices. You will protect these with passwords, but it’s also a good idea to obfuscate the url as well. So something like keithrozarioshouseinklang.dlinkddns.com may be a bit too much information, and would open yourself up to other attacks.
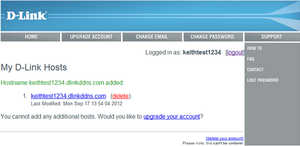
Once you’ve added that you should see something like this
Step 8: Enter host details on Dlink router
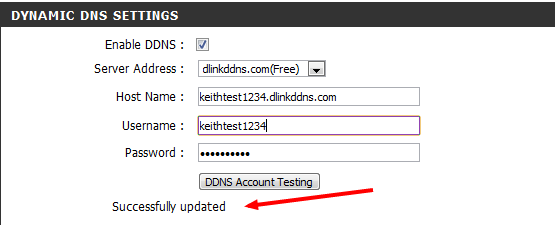
Here is where you want to enter the details from step 7 onto the router. Head over to Maintaneance-> Dynamic DNS, and enter the information below.
Remember to use the username and password from step 5, together with the host information from step 7. Select DlinkDDNS from the drop down, and finally test the connection. If everything went well you’ll see a “Test Successful” message when done.
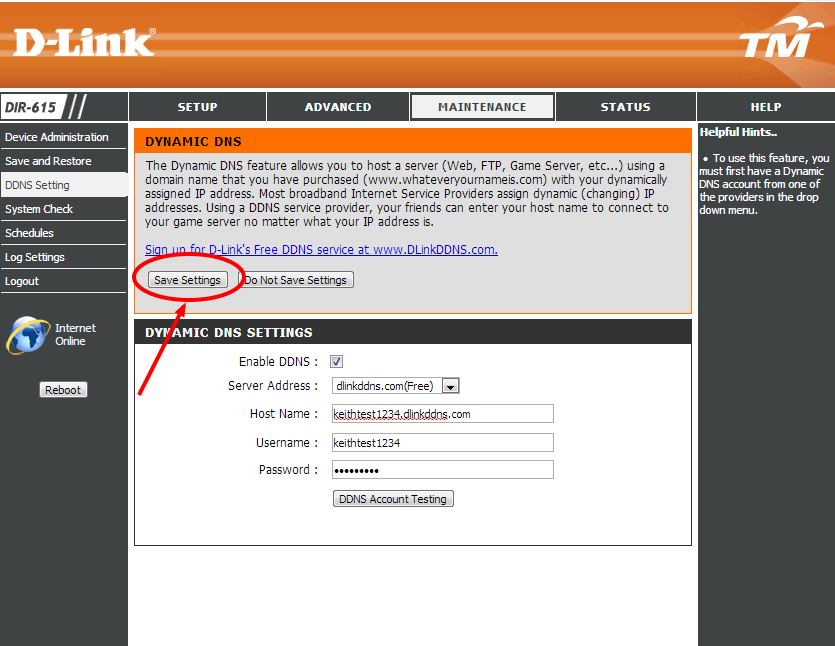
Step 9: Save your settings
Thanks to commented Joseph Ting, who highlighted that I missed one step in this tutorial. Once you’ve successfully tested out your settings, make sure you save your settings, so that they take effect, otherwise you’ll have to reset everything again (doh!).
Conclusion
Just like all my other tutorials, I try to make them very specific so that it’s easy for you. However, because it’s so specific the instructions may not be exactly as required, particularly if you have a different router or the same router with a different firmware. Exercise common sense, and don’t be afraid to ask questions in the comments. I always love comments and try to respond whenever possible–there are no stupid questions, just stupid answers–and you’ll find no stupid answers here.
The Dynamic DNS service from Dlink is free and works natively on your browser, so there really isn’t any reason not to use it. However, be wary, that if you don’t exercise proper security on your home network, you could be opening a backdoor to malicious hackers to gain access to your network and anything connected to it.
Use common sense, protect your network by changing the password of your unifi router and ensuring you obfuscate the port forwards on the router as well. Finally, you might want to disable the DDNS when you’re at home, and re-enable only when needed, particularly if you have IP cameras in your home.
Hi There…
Can you teach me how to setup a FTP server from my home ? I’m using a VIP10 Package, thus i have a static ip. However, when i try to follow any step from the internet… im failed, not so sure why… it went well over LAN, but failed to go through WAN.
Hey Farell,
Send me an email and we can discuss….can you access the FTP server from your LAN? What’s your IP and what FTP software are you using?
[email protected]
i follow your instructions but still after putting the ip address on the browser it says its restricted. i did this to my NAS device so i can watch my movies when im not at home… any help will be appriciated. thanks
Hi Iceman,
Which IP address are you placing in the browser? Port forwarding doesn’t operate within your home network.
What if I wana host website at my home server with a domain name I already purchased from hosting company? Do i need to do redirection there?
Yes.
First you need to setup a Dynamic DNS for your home. Unless you have a static IP package, your IP address will continuously change so setting up a Dynamic DNS is very important.
Once that is done, then you’ll need to re-direct the domain name you bought to your home server. This can be done in a few ways:
1) A 301 redirect (chances are you hosting company provides this free of charge anyway), so just redirect the domain to your Dynamic DNS name.
2) A ‘CNAME’ entry in your DNS. This is a bit more complicated but it’s slightly faster than a 301 re-direct and considered the ‘correct’ way to do things.
If you have a static IP package, then you can create a ‘A’ record in your domain to point directly to your home IP address.
Please beware, if you host a public facing website on your home server, you’re opening up a door for anyone to access your home network. Make sure you take the necessary security precautions.
Very usefull guide, thx!
hi,
It doesnt work. I wonder anything to do with port forwarding or routing? Even i use the DMZ which allow all ports, I still cant get to host. Well, the IP of the device I would wanna link is 192.168.0.10, and my router is 192.168.0.1, which is quite standard for everyone.
Im suspecting there is something behind Unifi blocking the IP and still looking for solution. Hope u can give me some advice. Thank you
Regards
Lian
p/s: about the ddns account testing, i got successfully updated as well.
Cool..that’s good news Lian.
it’s also good practice to change your router password so it isn’t admin/blank anymore.
ya, but I still not able to host even the ddns service is running. is there anything to do with the Broadband Transmission Unit (BTU)?
Nope nothing to do with BTU as far as I know, but I’m not a network expert.
But It’s important to note, if you host a camera on your local network (LAN) you can’t access it from your computer hosted on the same LAN via the DDNS. It’s a loopback issue that a lot of my other readers have been having similar problems with as well. The standard Dlink DIR-615 router from Unifi does not support loopback.
Try accessing your camera from an outside network.
Strangely, after I’ve set it and it updates for the first time, the next time I come back, the settings are gone. The DDNS settings are blank again. :/
I’m going to ask the obvious ‘stupid’ question Joseph.
Did you remember to ‘save your settings’ and ensure the settings were actually saved?
Well, it isn’t stupid at all! What a clever question to ask and it solved the problem.
That step didn’t even got included in this article.
Shows that dlink/TM has little to no proper UI design. Making us to forget that.
Fantastic. Always glad to help. I’ve added a Step 9 to the tutorial so that others don’t get caught out by the same error.
🙂
I wasn’t following this guide setting it up. I had problem with the settings go missing after the first update and found your article on the Internet.
Glad to have contributed in making your article better.
Again, thanks for your help. Really, how could I missed that? 😛
2 thumbs up on the lesson! I’ve owned my Dlink Dir-615 for a couple of years now & used it only for my home network (feebly I might add). Well, I’m a Linux guy through and through and having said that… 2 of my PC are running Backtrack and I’m always doing something “new” per-say… Funny thing… It never dawned on me till about a week ago why I haven’t invested anytime in this “little gem” of a router… I just wanted to say thank you for reminding me that I’ve over looked the thing for too long. I’ve actually pulled it off the cable modem and its my new network lab router for the time being. What can I say, it really is a great router and really does offer alot. Sorry for the book. I’m actually just really stoked that I’m getting to use it for more. Very great tutorial, very well spoken. I thank you sir.
Thanks Eric. Always glad to help 😉
hye sir, could you guide me on how to make ftp and rdp that can be access by network outside from my house. i’m using unifi vip5. thank you. FYI, i am able to access my rdp from my lan network, but still unable to access from outside. -hafiz
Email replied hafiz. In short though, I prefer Team Viewer over RDP, simply because I bought Windows Home Premium that doesn’t have RDP functionality, but I think the security and simplicity of Team Viewer trumps the downside of needing to install applications.
Team Viewer negates the need for any of this, but if you need to do RDP, then you’ll need to setup static IP, a port forward and finally a DDNS.
Let me know how it goes.
i Have got wamp server on my home computer when I call it from other computer on my network is answers but on DDNS address it fails. I shut down firewall on it don’t work and I assign a port to it still yet it fail I need a helping hand here
When you say assigned port, are you sure the port forwarding is working?
excellent guide .. worked without a hitch so far ..now i want to give access to a NAS server , a wd booklive so that i can share files with a friend but for the life of me i can’t figure out how to do it .. I set up the dns server on mybook with both my homw server and my ddns server from dlink, but can’t access it from outside my network .. i know i need ports set up or port forarding or something but can’t find info on how to do it .. help please
thank you, by following this guide, i was able to setup DDNS on my Dlink 2750B router.
What if I wana host website at my home server with a domain name I already purchased from hosting company? Do i need to do redirection there?
Yes.
First you need to setup a Dynamic DNS for your home. Unless you have a static IP package, your IP address will continuously change so setting up a Dynamic DNS is very important.
Once that is done, then you’ll need to re-direct the domain name you bought to your home server. This can be done in a few ways:
1) A 301 redirect (chances are you hosting company provides this free of charge anyway), so just redirect the domain to your Dynamic DNS name.
2) A ‘CNAME’ entry in your DNS. This is a bit more complicated but it’s slightly faster than a 301 re-direct and considered the ‘correct’ way to do things.
If you have a static IP package, then you can create a ‘A’ record in your domain to point directly to your home IP address.
Please beware, if you host a public facing website on your home server, you’re opening up a door for anyone to access your home network. Make sure you take the necessary security precautions.
Hi There…
Can you teach me how to setup a FTP server from my home ? I’m using a VIP10 Package, thus i have a static ip. However, when i try to follow any step from the internet… im failed, not so sure why… it went well over LAN, but failed to go through WAN.
Hey Farell,
Send me an email and we can discuss….can you access the FTP server from your LAN? What’s your IP and what FTP software are you using?
[email protected]
Very usefull guide, thx!
i follow your instructions but still after putting the ip address on the browser it says its restricted. i did this to my NAS device so i can watch my movies when im not at home… any help will be appriciated. thanks
Hi Iceman,
Which IP address are you placing in the browser? Port forwarding doesn’t operate within your home network.
hi,
It doesnt work. I wonder anything to do with port forwarding or routing? Even i use the DMZ which allow all ports, I still cant get to host. Well, the IP of the device I would wanna link is 192.168.0.10, and my router is 192.168.0.1, which is quite standard for everyone.
Im suspecting there is something behind Unifi blocking the IP and still looking for solution. Hope u can give me some advice. Thank you
Regards
Lian
p/s: about the ddns account testing, i got successfully updated as well.
Cool..that’s good news Lian.
it’s also good practice to change your router password so it isn’t admin/blank anymore.
ya, but I still not able to host even the ddns service is running. is there anything to do with the Broadband Transmission Unit (BTU)?
Nope nothing to do with BTU as far as I know, but I’m not a network expert.
But It’s important to note, if you host a camera on your local network (LAN) you can’t access it from your computer hosted on the same LAN via the DDNS. It’s a loopback issue that a lot of my other readers have been having similar problems with as well. The standard Dlink DIR-615 router from Unifi does not support loopback.
Try accessing your camera from an outside network.
i Have got wamp server on my home computer when I call it from other computer on my network is answers but on DDNS address it fails. I shut down firewall on it don’t work and I assign a port to it still yet it fail I need a helping hand here
When you say assigned port, are you sure the port forwarding is working?
2 thumbs up on the lesson! I’ve owned my Dlink Dir-615 for a couple of years now & used it only for my home network (feebly I might add). Well, I’m a Linux guy through and through and having said that… 2 of my PC are running Backtrack and I’m always doing something “new” per-say… Funny thing… It never dawned on me till about a week ago why I haven’t invested anytime in this “little gem” of a router… I just wanted to say thank you for reminding me that I’ve over looked the thing for too long. I’ve actually pulled it off the cable modem and its my new network lab router for the time being. What can I say, it really is a great router and really does offer alot. Sorry for the book. I’m actually just really stoked that I’m getting to use it for more. Very great tutorial, very well spoken. I thank you sir.
Thanks Eric. Always glad to help 😉
Strangely, after I’ve set it and it updates for the first time, the next time I come back, the settings are gone. The DDNS settings are blank again. :/
I’m going to ask the obvious ‘stupid’ question Joseph.
Did you remember to ‘save your settings’ and ensure the settings were actually saved?
Well, it isn’t stupid at all! What a clever question to ask and it solved the problem.
That step didn’t even got included in this article.
Shows that dlink/TM has little to no proper UI design. Making us to forget that.
Fantastic. Always glad to help. I’ve added a Step 9 to the tutorial so that others don’t get caught out by the same error.
🙂
I wasn’t following this guide setting it up. I had problem with the settings go missing after the first update and found your article on the Internet.
Glad to have contributed in making your article better.
Again, thanks for your help. Really, how could I missed that? 😛
excellent guide .. worked without a hitch so far ..now i want to give access to a NAS server , a wd booklive so that i can share files with a friend but for the life of me i can’t figure out how to do it .. I set up the dns server on mybook with both my homw server and my ddns server from dlink, but can’t access it from outside my network .. i know i need ports set up or port forarding or something but can’t find info on how to do it .. help please
thank you, by following this guide, i was able to setup DDNS on my Dlink 2750B router.
hye sir, could you guide me on how to make ftp and rdp that can be access by network outside from my house. i’m using unifi vip5. thank you. FYI, i am able to access my rdp from my lan network, but still unable to access from outside. -hafiz
Email replied hafiz. In short though, I prefer Team Viewer over RDP, simply because I bought Windows Home Premium that doesn’t have RDP functionality, but I think the security and simplicity of Team Viewer trumps the downside of needing to install applications.
Team Viewer negates the need for any of this, but if you need to do RDP, then you’ll need to setup static IP, a port forward and finally a DDNS.
Let me know how it goes.