Gov-TLS-Audit got a brand new domain today. No longer is it sharing a crummy domain with sayakenahack (which is still blocked in Malaysia!), it now has a place to call it’s own.
The domain cost me a whooping $18.00/yr on AWS, and involved a couple hours of registration and migration.
So I felt that while migrating domains, I might as well implement proper security headers as well. Security Headers are HTTP Headers that instruct the browser to deny or allow certain things, the idea being the more information the site tells the browser about itself, the less susceptible it is to attack.
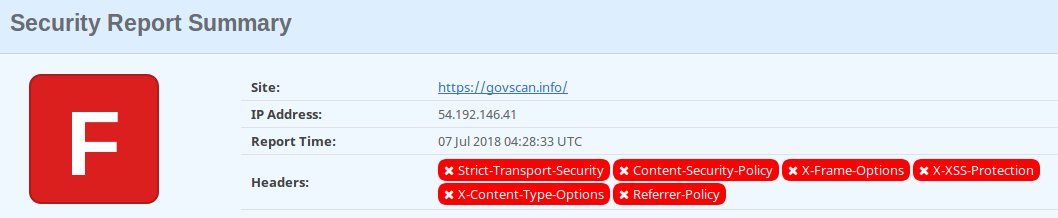
I was shocked to find out that Gov-TLS-Audit had no security headers at all! I assumed AWS (specifically CloudFront) would take care of ‘some’ http headers for me — I was mistaken. Cloudfront takes care of the TLS implementation, but does not implement any security header for you, not even strict-transport-security which is TLS related.
So unsurprisingly, a newly created cloudfront distribution, using the reference AWS implementation, fails miserably when it comes to security headers.
I guess the reason is that HTTP headers are very site-dependant. Had Cloudfront done it automatically, it might have broken a majority of sites And implementing headers is one thing, but fixing the underlying problem is another — totally bigger problem.
But what security headers to implement?
HTTP Security Headers
Mozilla have a great page on web security, with a cheatsheet of things to do in a proposed order. The cheatsheet and my score for govscan.info (before I changed it) are here:
- TLS Configuration – Done
- Resource Loading – Done
- Redirections from HTTP – Done
- Strict Transport Security – Not Done
- X-Frame-Options – Not Done
- Cross-site Request Forgery Tokenization – Not Done
- Cookies – Optional
- X-Content-Type-Options – Not Done
- contribute.json – Optional
- Content Security Policy – Not Done
- Cross-origin Resource Sharing – Not Done
- Referrer Policy – Not Done
- X-XSS-Protection – Not Done
- robots.txt – Optional
- Subresource Integrity – Done
- Public Key Pinning – Optional
The list is arranged in priority order, with the highest priority actions at the top, so there was a lot of red for me, fortunately all of them was http headers, so it was a simple fix (sort of). In fact, I could fix all but one of the problems above by just setting the following headers:
X-Content-Type-Options:nosniff
X-Frame-Options:DENY
X-XSS-Protection:1; mode=block
Strict-Transport-Security:max-age=63072000
Referrer-Policy:no-referrer
The most difficult http header to tackle was the Content Security Policy. So before we go into adding http headers on Cloudfront, let’s first understand what content-security-policy is.
Content Security Policy
There’s a great many resources on Content Security Policies (CSP) from Mozilla, content-security-policy.com & troyhunt. It all boils down to this, a CSP is a directive to the browser on what resources are whitelisted for your website. It tells the browser, what scripts, images, fonts, etc can be loaded and which sources are permitted for these elements to be loaded from.
This prevents anyone from inserting images, scripts and even fonts directly on the page, because the CSP would not allow it. You can even set two CSPs on your site, one that will be enforced by the browser (will not load scripts, unless whitelisted by CSP) and one that will merely be reported by the browser — a report will be sent to the endpoint for further screening.
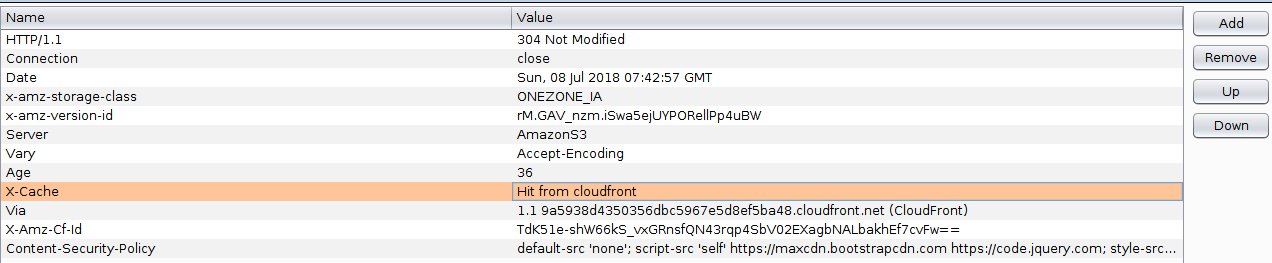
At the end though, this was the CSP I settled on:
Content-Security-Policy:default-src ‘none’; script-src ‘self’ https://maxcdn.bootstrapcdn.com https://code.jquery.com; style-src ‘self’ https://maxcdn.bootstrapcdn.com; upgrade-insecure-requests; form-action ‘self’; connect-src ‘self’ api.govscan.info; img-src ‘self’; frame-ancestors ‘none’; base-uri ‘self’; https://cspgovscan.report-uri.com/r/d/csp/enforce
It might look confusing, it’s basically a bunch of semi-colon delimited fields, which we can read last-to-first.
report-uri https://cspgovscan.report-uri.com/r/d/csp/reportOnly
This tells the browser to report all violations to the endpoint above. Report-Uri is a collaboration between troyhunt and scotthelme, and it’s a great tool to get started for securing your site.
base-uri ‘self’;
This limits any <base> elements to origin. The <base> elements specifies the base url for all relative urls to use. There isn’t a good reason for this to be anything other than origin.
frame-ancestors ‘none’;
This specifies valid parents that may embed on a page, since govscan.info has no embeds like tweets, or youtube videos, I didn’t need this. So I set to ‘none’. Note that this element doesn’t fallback to default-src.
img-src ‘self’;
This tells the browser that all images should only be loaded from origin. i.e. all images on this site should only come from govScan.info and nowhere else.
connect-src ‘self’ api.govscan.info
The API on the site actually connects to https://govscan.info/api/v2/ but just to future proof this, I decided to allow api.govscan.info as well. Changing a CSP on CloudFront using the method we’re about to use is painfully slow (as we’ll see).
form-action ‘self’;
All forms should only post to origin.
upgrade-insecure-requests;
Any requests from site should be upgraded to https instead of http. This will actually give you a performance boost if you have a lot of http requests, and obviously make those request more secure.
style-src ‘self’ https://maxcdn.bootstrapcdn.com;
All css files should come either from origin or https://maxcdn.bootstrapcdn.com, since i use bootstrap’s bootstrap.min.css.
script-src ‘self’ https://maxcdn.bootstrapcdn.com https://code.jquery.com;
Scripts should only be trusted from origin, maxcdn and code.jquery. Important to note, that the html on the page sources these scripts via https, anonymously, and using an integrity sha-256 check to ensure they haven’t been manipulated.
default-src ‘none’;
Block everything by default unless explicitly mentioned here. Not all fields above will fallback to default, so you still have to hand-pick each field to be sure, but a default of ‘none’ is a good starting point.
Now how to add these headers to the page?
Lambda@Edge to insert http headers
 The only way (I know off) to insert http headers into a S3-based website on AWS, is via the use of CloudFront + Lambda@Edge. You need CloudFront for custom domains with TLS anyway, and now you need an additional Lambda@Edge implementation to inject those http headers into the user response.
Amazon allow you to run Lambda@Edge at 4 possible points in time during a user request. The seemingly obvious place to inject them would be just before a response is sent to the user (viewer-response), but this is expensive as we’d need to run the Lambda functions at every user response.
The better place to run them is at origin-response, i.e. after CloudFront has retrieved the object from the origin, but BEFORE it has saved it to cache. This way your injected http-headers get pushed to cache, and your lambda function is no longer needed. It’s faster, and less expensive — although I’m still moaning over the need to run a lambda function to do this.
In the end, this is the JavaScript function that injects the headers into my site:
Testing your CSP
 However, origin-response is a pain to test, because any change to the CSP, requires that you redeploy the lambda@Edge functions (which aren’t to deploy as their non-edge siblings), then wait for it to propagate across all edges and invalidate the cache. That’s a lot of steps to test.
Instead, I found, running unit test with BurpSuite to be easier. I initially considered spinning up an Apache webserver just to do this, but that would also require cert generation etc. BurpSuite also requires cert generation, but the process is pretty straightforward as the tool generates them for you already.
I found that by simply running a proxy, you can add a CSP http header to the response, to check if your CSP works. You don’t even need to worry about looking at the browser console, as BurpSuite will intercept the outgoing post to your report-uri instantly, and you can view it on the same tool.
This allows you to quickly fine-tune your CSP, to get it out of ‘unit-test’ mode. This won’t work if you’ve got 100’s of pages to test with, but works pretty well for something like govScan.info, which only has a handful of pages.
Deploying Lambda@Edge
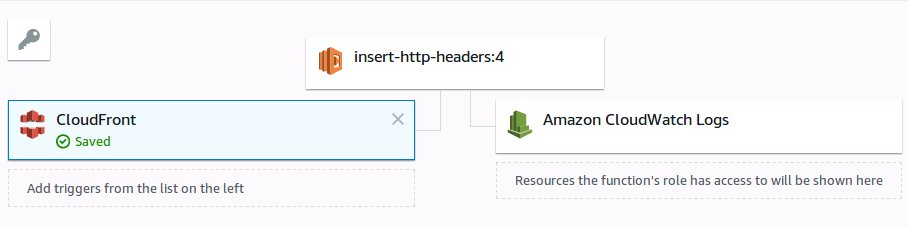 Once you’re OK with the CSP, and pretty confident if won’t break. Create a Lambda@Edge function (remember it has to be in us-east-1/N.Virginia), and associate it with the CloudFront behavior.
Now, here’s the tricky part, Lamdba@Edge requires a specific version of your function. Unlike regular lambda’s that can reference $Latest, Lambda@Edge requires that you publish a version of the function, and use the published version.
Once you have a version of the function, you can then associate it with a CloudFront behavior — remember, the function is associated with the CloudFront Behavior, not CloudFront distribution. A behavior is a path specific parameter, that specifies which origin CloudFront should reference, e.g. I have a behavior for /api/v2 that sends traffic to an API Gateway, and a /files behavior that redirects traffic to an S3 bucket, and finally a * with takes all other traffic to a html file hosted on a separate S3 bucket.
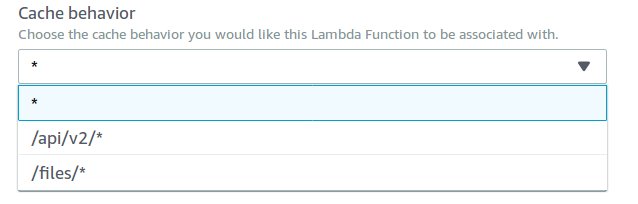
For the purpose of this exercise, I only embed the security headers for the site (and not the API) — the API Gateway can use it’s own lambda functions to provide the headers.
This is the best link on implementing security headers via Lambda@Edge.
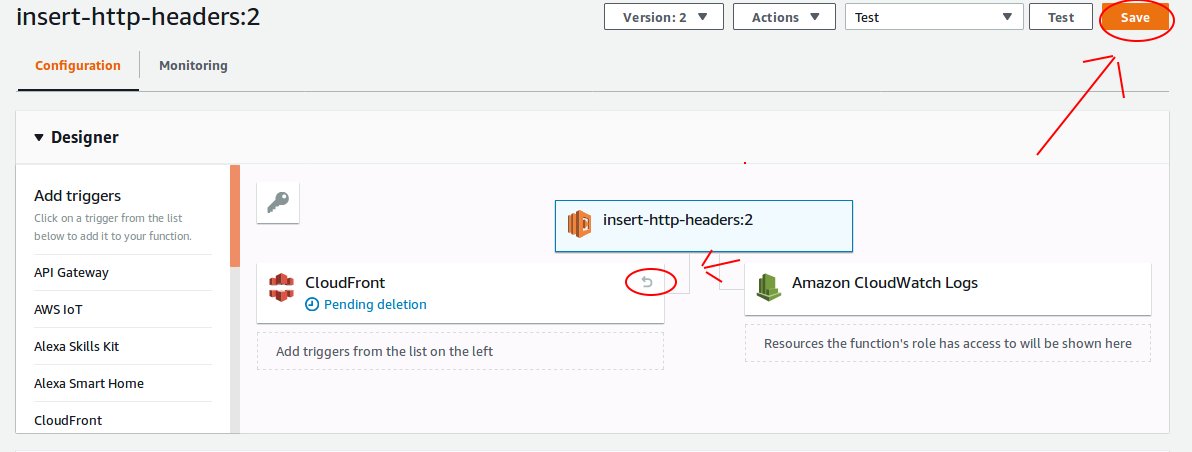
Modifying Lambda@Edge
But once you’ve got your http headers deployed, that’s the only time you can test them against Mozilla’s observatory, or scott helme’s security-headers.com and obviously you’ll probably want to make changes.
There is a serverless plugin available to deploy lambda@edge, but the plugin deploys the function on new CloudFront distributions everytime, not modify existing ones. So for me that was a serious problem. Cloudfront distributions are one of the slowests things to deploy on AWS. So I decided to do this the old fashioned way — by hand.
By first deleting the trigger old lambda function — and then creating a new version of function, and repeating the previous steps. It’s not just tedious and manual (3 button clicks) — it’s very very slow. The CloudFront distribution takes ~20 minutes to propagate and then you still need to invalidate the cache, another ~5 minutes before you can test.
Hence, try to test as much as possible using BurpSuite, and use this as a last minute tidy up.
Results:
Once all was done, and a couple iterative re-test, here’s what I got.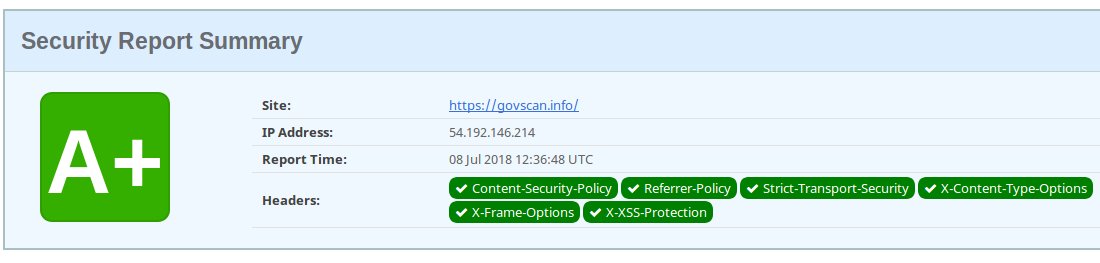
And of course, a few more tweaks (like base-uri and frame-ancestors) got me this on Mozilla’s observatory — which had no recommended changes for me (whoop!)
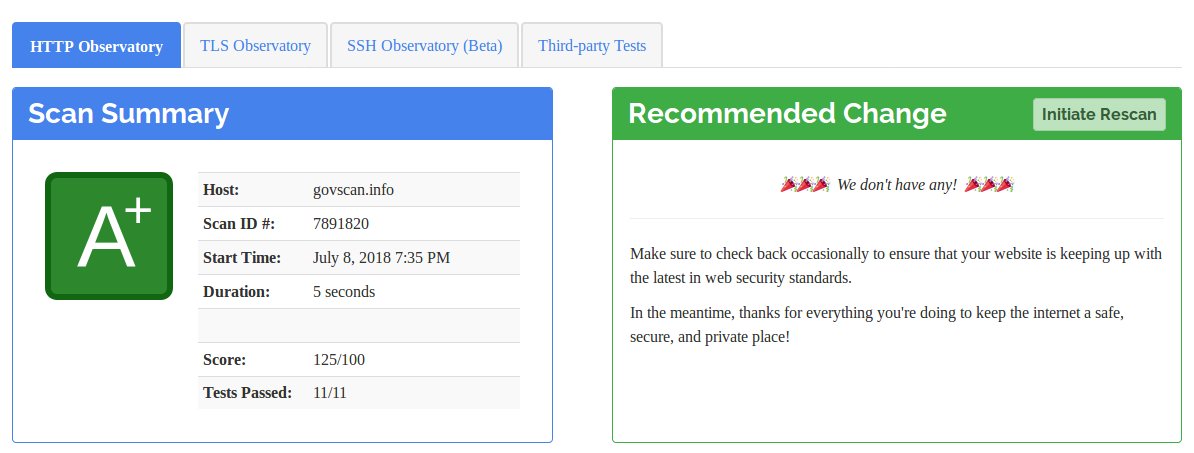
Not bad for a weekend’s work.
Conclusion
As much work as putting a CSP together is, doing this early on in your project is far easier than doing it later. If you’re thinking of starting a project today, make sure you implement a CSP as part of your ‘hello world’ phase. Trying to undo CSP errors later on is a nightmare.
If you’ve already got a project, putting a CSP together for a blog with 500+ post, and God knows how many embeds is going to be painful, but you can always start with very restrictive CSPs in report-only mode, and go from there (which is the recommended).
Now that govScan.info has a new domain, and spanking new domains, I’ll be looking to do some robots.txt, security.txt and contributions.json files before finally biting the bullet and try to make it 100% serverless.