As with all new shiny equipment, a newly installed router in your home requires a few things to be configured to properly secure it.
Goes without saying, that you should change your WiFi password the moment the technician leaves your home, but there are other things you’d need to configure in order to secure your router against common attacks.
Now remember, even if you follow all the advice on this post, there’s a strong chance that you’d still be hacked somewhere down the road–especially if you’re relying on a crappy consumer grade router, but taking these precautions raises your security level above the general population, giving you an edge over everybody else, and sometimes the difference between being hacked and staying safe could be one simple configuration on a router.
For this post, I’m going to use the standard Dlink 868L router that StarHub gave me when I signed-up for their 1Gbps package. While the post is specific, the general principles still apply to any router you own.
Step 1: Logon to the router
Goes without saying, all changes have to be made on the router itself. The good news is that all general purpose routers like the Dlink-868L come with a web interface, i.e. the router host a website on your network that you can use to change settings.
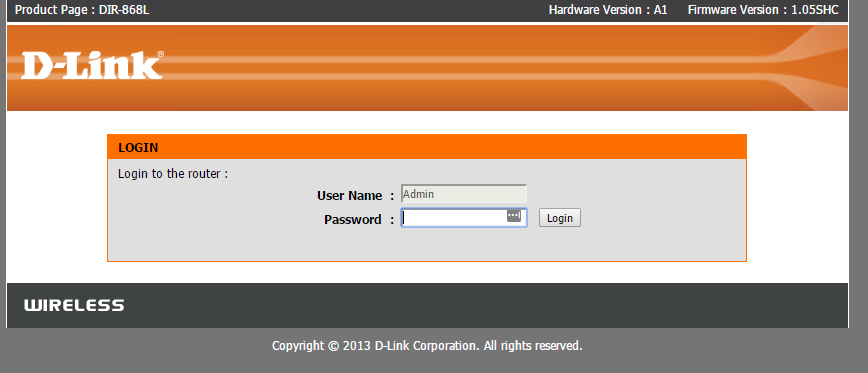
Fire up a browser like Chrome or Firefox (God forbid you’re on Internet Explorer), and point the address bar to http://192.168.0.1 and you ‘should’ come to the router homepage (image below). If not, try the other possible addresses, like http://192.168.1.1 or http://10.1.1.1, if none of those work, you’ll need to go to your ipconfig on your local windows client to determine the ‘gateway’ ip address of your router.
Once there, you’ll see the following screen. For most StarHub customers, just logon with the admin user and leave the password field blank–as in don’t enter anything for the password.
Step 2: Change your router password
As you’d guess. The first step is to secure the router interface, to ensure no one has access to changing sensitive setting on your router.
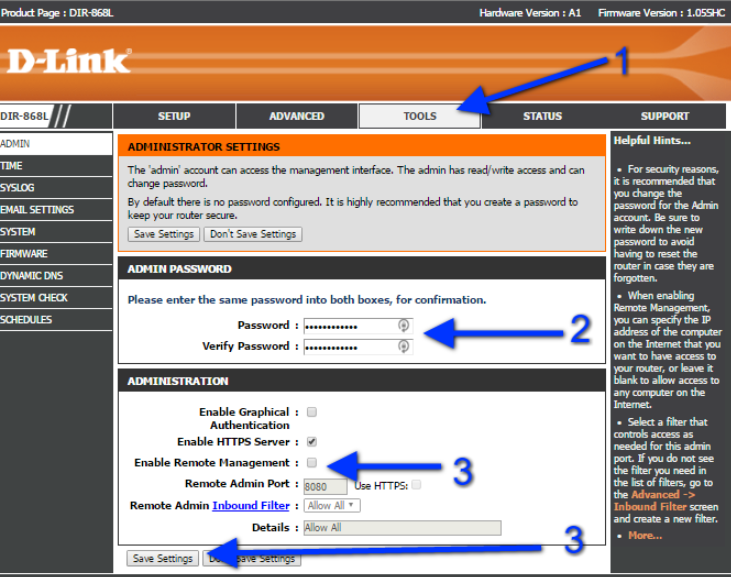
To do that, head on over to the ‘Tools’ section (step 1), then enter in a long and secure password for your router (step 2)
While you’re on this page, you might want to make sure that your ‘Enable Remote Management’ setting is unchecked as well (step 3). Remote Management, allows anyone from the internet to view this login screen–which isn’t good. When the box is unchecked, the router will only allow connections from the internal network (i.e. computers connected to the same WiFi or plugged into the router) to access the configuration page.
And finally don’t forget to hit save.
Step 3: Disable WPS
WPS is a standard for simplified logging onto WiFi networks. They help you configure things like WiFi printers to log onto the network. But WPS is a poorly secured protocol, and you’re better off without it. Disable WPS to ensure no one has a ‘back-door’ into your WiFi network.
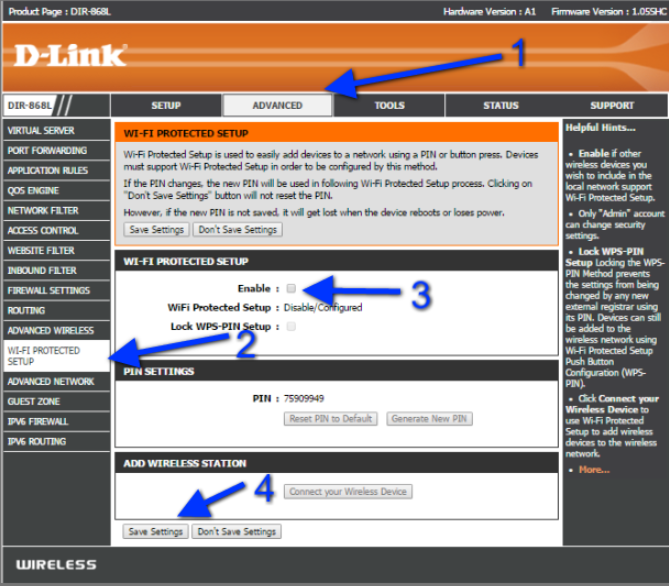
From the router home page, go to Advanced (Step 1), then Wi-Fi Protected Setup (Step 2), and then ensure the WPS Enabled checkbox is unchecked. (Step 3)
As with all other settings on the DLink router, don’t forget to hit ‘save. (Step 4)
Step 4: Disable UPnP
Universal Plug and Play simplifies the configuration of IOT devices like webcams and printers–but they also severely impact the security of your network. The protocol allows devices to configure firewall rules on the router without user intervention–and many times hackers use these rules to access your internal device.
True without UPnP, you’d need to go through the hassle of port-forwarding yourself, but one of the reasons why Mirai exist, is because UPnP is a shitty protocol that should be consigned to the dustbin of poorly written crap.
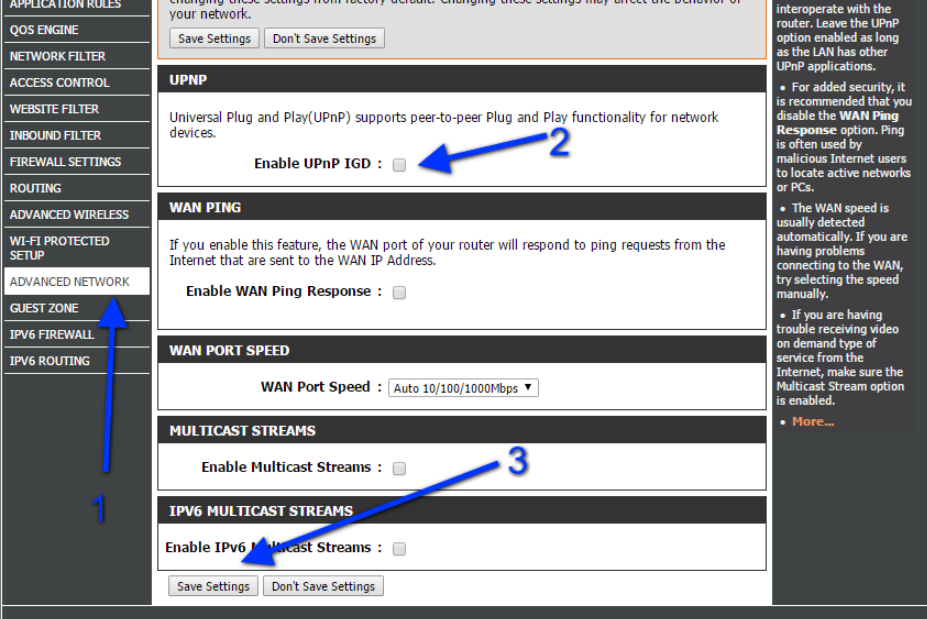
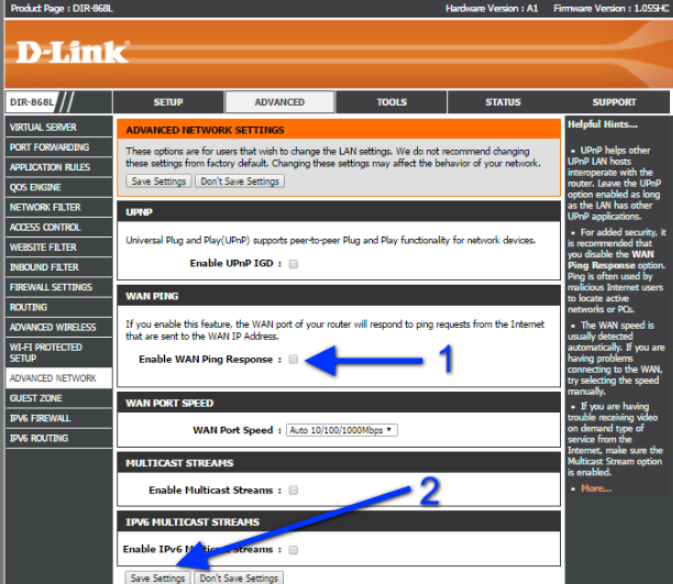
While still in the ‘Advanced’ tab (from the previous setup), head over to ‘Advanced Network’ (Step 1), ensure the Enable UPnP IGD checkbox is unchecked (Step 2) and don’t forget to hit save (Step 3).
Step 5: Disable WAN ping
While on the same page, you also want to disable Wan Ping Response.
Ping’s are network messages sent to IP Addresses to see if there are computers on the other end. The general idea is that a computer from one end of a connection can ping the other end, to see if the network connection between the two ends is fine. Ping’s are invaluable to network engineers for troubleshooting, but they also provide an avenue for hackers to exploit.
Hackers can ping an entire IP address range to determine which addresses have computers on them, and then work on hacking those computers. If your computer doesn’t respond to a Ping, you might have difficulty troubleshooting a network problem–but you’d be hackers hunting IP networks with ping responses.
To disable Ping responses on the WAN (the internet end of your router), uncheck the ‘Enable Wan Ping response’ box in the Advanced->Advanced Network section of the router home page. [hint: it’s the same page as the previous step]
Step 5: Check your DDNS settings
If you’ve got DDNS setup, now’s a good time to double check. If you don’t know what DDNS is, it’s still a good idea to double-check the DDNS page on the router, to make sure no one left a nice little back-door to it.
Step 6: Change your WiFi password
After you’ve done all of this, change your WiFi password to something strong–minimum 12 characters.
Next give your router a nice little reboot, and you’ll be far more secure now then you were before making these changes. Again, this doesn’t guarantee you won’t be attacked, but it does protect you from the more popular attacks on the internet.
Conclusion
The Dlink 868L router that StarHub provide their subscribers, is a pretty decent router. But you need to take ownership of the device, by setting it up securely and properly to avoid being the victim of a script kiddy hacker.
It’s one thing to get hacked because the hacker employed sophisticated techniques to break into your network–it’s another to get owned by a script kiddie executing trivial scripts, all made possible by your laziness is setting up your home router.
Star hub appear to have updated their router home page and your instructions now don’t match the screen. Would you please update your security instructions. They are otherwise really great and use simple language.