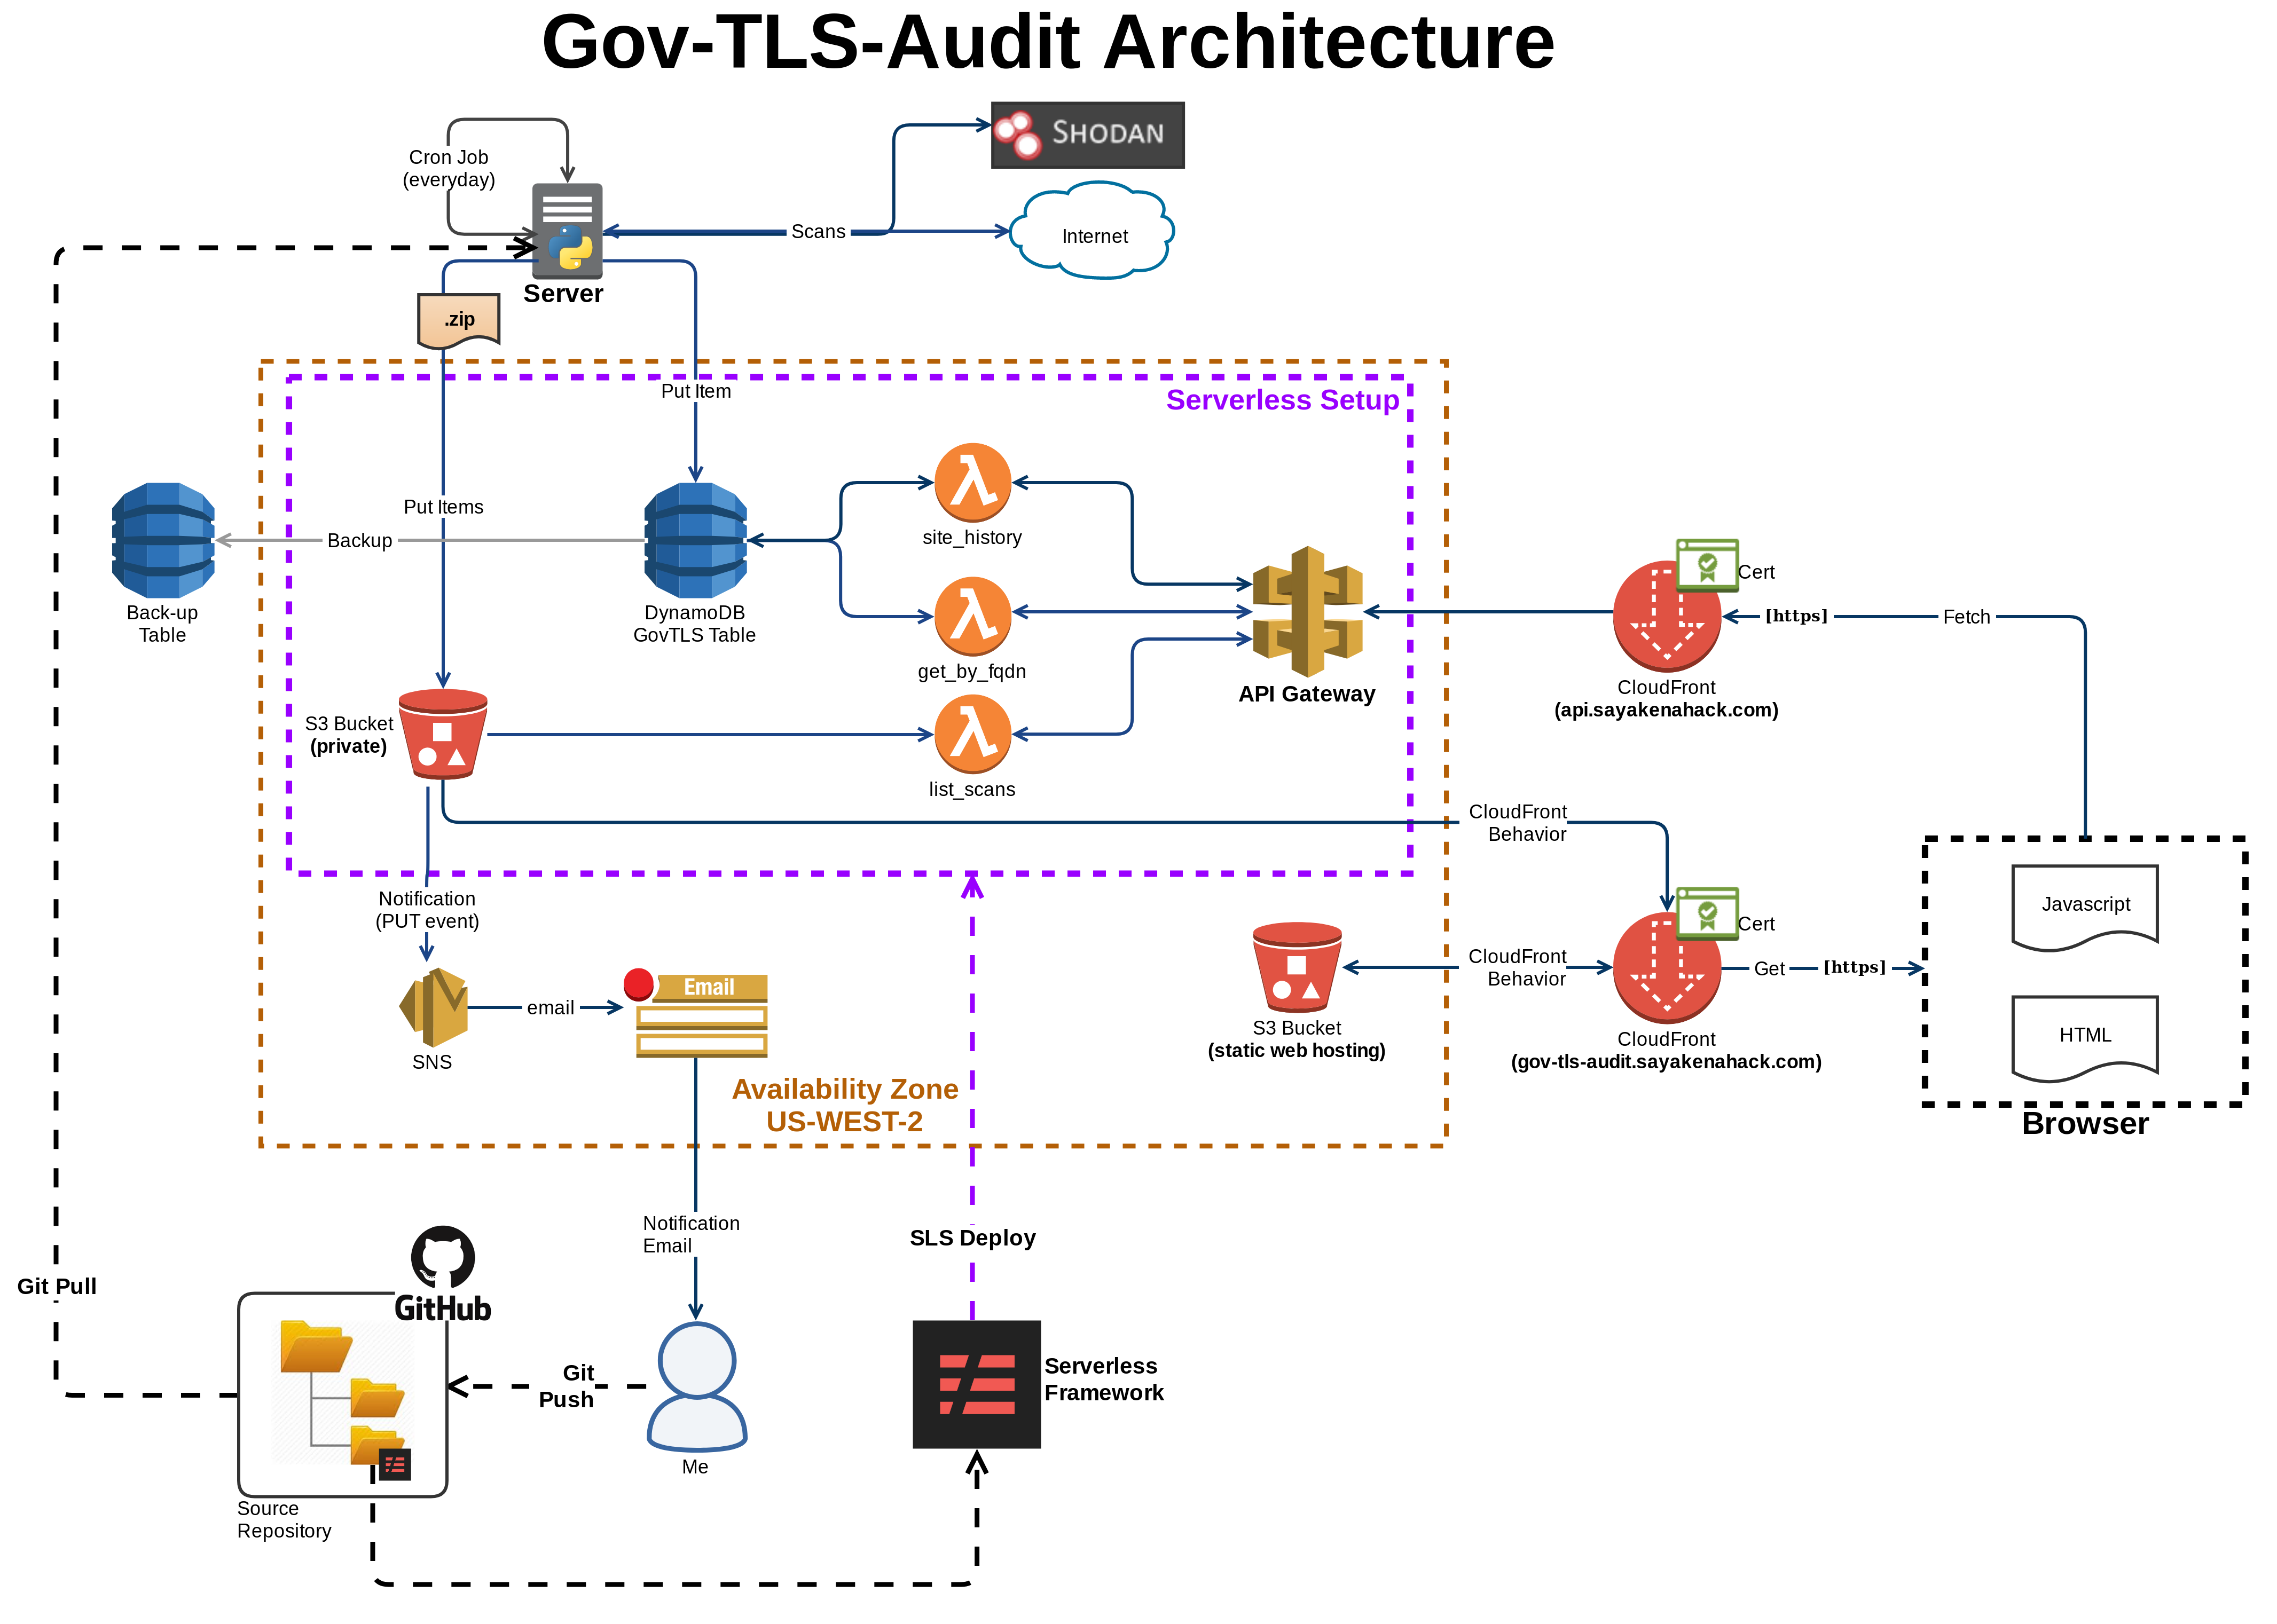
Last Month, I embarked on a new project called GovTLS Audit, a simple(ish) program that would scan 1000+ government websites to check for their TLS implementation. The code would go through a list of hostnames, and scan each host for TLS implementation details like redirection properties, certificate details, http headers, even stiching together Shodan results into a single comprehensive data record. That record would inserted into a DynamoDB, and exposed via a rest endpoint.
Initially I ran the scans manually Sunday night, and then uploaded the output files to S3 Buckets, and ran the scripts to insert them into the DB.
But 2 weeks ago, I decided to Automate the Process, and the architecture of this simple project is complete(ish!). Nothing is ever complete, but this is a good checkpoint, for me to begin documenting the architecture of GovTLS Audit (sometimes called siteaudit), and for me to share.
What is GovTLS Audit
First let’s talk about what GovTLS Audit is — it’s a Python Script that scans a list of sites on the internet, and stores the results in 3 different files, a CSV file (for human consumption), a JSONL file (for insertion into DynamoDB) and a JSON file (for other programmatic access).
A different script then reads in the JSONL file and loads each row into database (DynamoDB), and then uploads the 3 files as one zip to an S3 bucket.
On the ‘server-side’ there are 3 lambda functions, all connected to an API Gateway Endpoint Resource.
- One that Queries the latest details for a site [/siteDetails]
- One that Queries the historical summaries for the site [/siteHistory]
- One that List all scan (zip files) in the S3 Bucket [/listScans]
Finally there’s a separate S3 bucket to serve the ‘website’, but that’s just a simple html file with some javascript to list all scan files available for download. In the End, it looks something like this (click to enlarge):
Let’s talk Source Control
 How do we operationalize something like this? Let’s start with source control (you have a source repository don’t you?!).
With the exception of a few bash scripts, yaml files and json configurations, everything in GovTLS is in Python. I code all of it using the PyCharm community version, which comes has great GitHub integration. I store everything in a single repo, which means the scanning component (python scripts) and the lambda + serverless components all reside in one place. You can view the Repo here.
From previous projects I found that segregating components into individual repos to be a headache managing, switching between PyCharm projects and Repos was more trouble than it was worth. Plus since it’s all a single project, having just one GitHub repo to manage made sense.
The root directory on the repo is the scanner (since I wrote it first), it’s Python script that actually scans the website.
The serverless components, including the Lambda code and yaml file is in the lambda/ folder. I initialized this folder for serverless, and can deploy the Lambdas using a simple sls deploy once I’m in the lambda/ folder.
Because all of this is in one Repo, and I use PyCharm, all the common Git commands can be executed from within the IDE including pushing this to GitHub. Initially I did this in a proper Branch->Code->Commit->Pull_Request way, but towards the end I got sloppy and started committing code directly to Master (tsk tsk tsk!). In any case, the code resides in GitHub, which means it’s publicly viewable and backed-up.
https://github.com/keithrozario/Gov-TLS-Audit
Drawbacks of a single repo
The one drawback of keeping everything in a single repo, is that the Python Interpreter for the scanner component includes non-standard modules that I had to pip install (all of this in the requirements.txt file) — and these shouldn’t apply to the lambda functions that operate on bare-bones Python. Switching interpreters while coding is a pain, but I find that I rarely have to switch since I’m either focused on one (or the other) for long stretches at a time.
Also note, to run the Lambda function on your local machine requires you have an AWS key in the ~/.aws/credentials file, and that you need to pass in an event & context variable to the function to run, this can be painful (and inconsistent) but it works for simple Unit test, later we’ll see how the Serverless framework helps with the testing using sls invoke.
Scanning
So how do we scan? I code entirely on my laptop which is great for building, but not for running. For running this on a daily basis, I have a NUC device tucked in the corner of my house, that runs Ubuntu. Which is great, because Ubuntu + GitHub = Awesome!
All I have to do is:
- Git Clone the repo
- Minor setup (documented in the initialize/Gov-TLS-Init.sh file)
- Pip install the requirements
- Execute the cron_scan.sh file
(1) and (2) have to be executed just once in a lifetime, and from then on, all that is required is step (3). Which makes setting this up as a Cron Job extremely easy. A simple crontab -e, and we’ve got this running everyday at a specific time.
Great, but let’s talk about IAM users because that’s important.
IAM for Scanning
 As mentioned, the python script relies on getting the AWS API Key from the ~/.aws/credentials file. On my laptop where I build stuff, this api key is for the root user of the AWS account, which means it has all the privileges on aws. Because I don’t want to be adjusting privileges everytime I add a new features, but it doesn’t make sense to store this on my running environments, I rarely add new features there.
If the server is compromised, my root API key could be used to spin up instances for Monero mining or phishing scams etc. So to limit my exposure to these threats I create a non-root IAM user.
I assign that user the bare minimum privileges, it can only write (not even read) to the specific DynamoDB Table and S3 bucket. This way if the server is compromised, and I lose my api key, the damage is limited. To further limit the damage, I’ve set versioning on the S3 bucket, to ensure the attacker can’t over-write my backups.
No Monero mining on my dime here! The AWS permissions for the IAM user are also in the repo in the aws_permissions/ folder.
Enough Scanning, let’s talk the server-side.
Deploying Lambda using Serverless
Backing up the DB (why US-WEST-2)
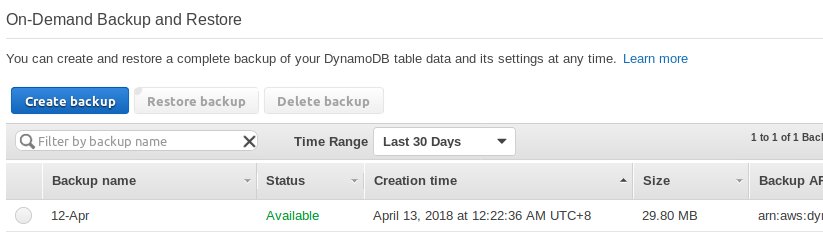
First off, let’s address an elephant in the room, why deploy this in US-West-2, when I’m in Malaysia? The latency would be astronomical — and it is, almost a quarter second (250ms) in additional latency.
But DynamoDBs in specific datacenters have native Point-in-Time recovery(PITR) and continuous backup functions, that aren’t available in Singapore (AP-Southeast-1). The choice of US-West-2, is an arbitrary choice from the regions that do support these very useful features — well actually it looked to be cheapest choice, so not so arbitary.
When PITR and Continuous backsups do eventually come to Singapore, I’ll move the table across. Spinning up a Data Pipeline just to backup a DB isn’t acceptable to me. Especially when you see just how blazing fast the backup of DynamoDB is, using native AWS functionality.
AWS if you’re listening — put DynamoDB backups to Singapore already!!!
Serverless Framework
 Now onto Serverless — the serverless framework is an amazing tool to automate the deployment of Serverless components like Lambda functions to AWS. In the past, I literally used the console to code & test my lambda functions, which wasn’t very good. The console is quite feature rich, but very manual intensive, and hardly operational when we need multiple environments for multiple functions.
With serverless, I still Code and Unit test in PyCharm, but then I deploy to AWS using the framework. It automatically loads the lambdas + API Gateway configuration (also S3 and DynamoDB) and I can deploy multiple stages and environments with just different CLI arguments. Once the code is uploaded I use Shell Scripts to do the regression testing of the functions.
The regression testing includes invoking the lambdas via the Serverless Framework (you can invoke with json parameters), and just curl-ing the API Gateway endpoints with the correct query string parameters. The Production API Gateway is exposed via CloudFront, while the Dev API Gateway is curled via the native url from AWS.
Without serverless this would have to be done manually by hand from the console. Pretty manual, and time-consuming.
Serverless is great for many reason, but I’ll list the key ones here:
- I can invoke the lambda from the command line, meaning I can automate the regression test.
- I can deploy multiple stages and environments, but just changing the command line arguments to –stage UAT
- It keeps all the code in PyCharm and local machine — which means it stays in the right repo. Previously I would code in the console and manually copy the code out into the Repo.
Why 2 CloudFront Distributions?
 Believe me I tried!! And tried!! And tried!!
I spent days trying to figure out what was wrong with my CloudFront(CF) distributions, when I attempted to collapse all of this into just one CF distribution (out of gov-tls-audit.sayakenahack.com). For some reason, I kept on getting a cryptic Missing Authentication Token error. I eventually gave up!! (hangs head in shame).
[update: I found that the CloudFront Distribution Origin Behavior, still passes the path to the Origin. i.e. a call to example.com/api/test will still send /api/test to the origin to handle, hence your API Gateway must be configured to accept /api/test as well, even though /api/* is the behavior mapping]
The only work around, was to have 2 distributions, one for the API and one for the website, and the website could be hosted on a S3 bucket in AP-Southeast-1 (helping with latency).
The AWS certified bunch will note, that cloud-front distributions are not necessary for either the S3 bucket (I can directly host the website natively there) or even API (we can use regional endpoints instead of Edge-Optimized).
But S3 buckets didn’t seem to have the ability to deliver HTTPs on a custom domain natively, and a CF distribution gives me the ability to create a separate behavior for the /files folders where I store my scan files. The contents of this buckets includes all the zip scan files, and currently hosted in US-West-2 together with everything else.
Notifications
Let’s not just to Dev without the Ops.
With the scans running everyday, I would like to see an email of whether it was successful. To do this, I setup a simple SNS service to email me once a new item is loaded into the S3 bucket. That way, every morning when I wake up, I can see an email that tells me if the scans were successful.
In the next iteration, I might move this to something like a Slack Channel, which has many many advantages over an email.
Setting the permissions for this was kinda painful, the permisions for the SNS notification is in the aws_permissions folder of the repo for reference.
Website
Finally we have the website, which if you visit at https://gov-tls-audit.sayakenahack.com is bare, but it’s a simple HTML + JS page that queries the listScans endpoint of the API, and displays a list of all scan reports available. The CloudFront distribution redirects all /files queries to a different S3 bucket that stores these files.
Also because the site is an S3 bucket behind a CloudFront distribution — we can redirect users to use HTTPS if they query with just plain ol’ HTTP, and I do this for all my origins.
Conclusion
After the 3rd iteration, I finally have something that almost looks like a finished product (sans the website of course!).
And boy, did this take time. I learnt so much along the way and I’m really pleased with the results. But here’s some key take-aways.
First, while there might be 1 (or 2) ways of doing something right, there’s 1000 more ways to do it wrong. When scanning for TLS on websites, I had to learn to cope with the various redirection methods and the various errors that were popping up, catering for all exceptions takes a massive amount of effort — but never be tempted to just catch all exceptions — knowing why something fails is more important than having a successful run.
Secondly, building this took time. I naively thought I could build the scanner in a weekend — it took months of time to do. Looking at the final architecture diagram though, it’s easy to see why — and even then I’ve left out all the hard work I did scanning for .gov.my hostnames, and how I wrote a crawler to get it, the nmap scans on the CIDRs, and the Shodan stitching of the results. So this was collectively where I spent the last 2 months of my free time.
Third, a lot of the effort spent of DevOps-ifying the process pays off. Serverless saved me countless hours in debugging because I could invoke the lambdas from my command line. GitHub is amazing for obvious reasons, and taking some time out to write the regression test (even though they might just be in Shell Scripts) was worth it. Spending time on the Pipeline pays off even for small things like this — imagine how much it would save you for your larger projects.
Finally, this was so much fun, and lot less controversial than my previous project :). And looking back on sayakenahack (which was just 6 months ago) the code is a lot better, the architecture is more robust, and everything is just more polished. I’m really pleased with the improvements I’ve made in that time.
To cap things off, I do say so myself, this was a win. Next I need to get back to studying for my OSCP, hence the blog will be on hiatus for next 2-3 months. See you on the other side.